Tuesday, December 22, 2009

Photo Frame Decorated With Felt Flowers


When we were kids we were always encouraged to make handmade gifts for our near and dear ones. With the festival season around, I thought of this quick and easy photo frame craft project. Kids can make this project themselves or with some supervision and it can be a great gift for family or friends.

Following supplies are needed for the project :
- Unfinished wooden photo-frame (easily available in craft stores)
- Felt ( red , orange and green)
- Acrylic paint (yellow)
- Varnish
- Paintbrush
- Embroidery thread(yellow, green) and needle
- Glue and Scissors


I painted the unfinished wooden photo frame with yellow acrylic paint. After the paint dried, I applied a coat of varnish to give it a finished look.

You can use the color of your choice or if you want you may even use a plain finished photoframe and embellish it using the felt flowers.


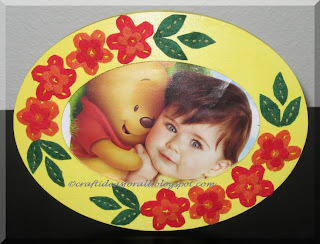
For the flowers I used red and orange felt and arranged them as shown in the picture. I also cut leaves using green felt.The felt I have used in this project has adhesive backing but that's not essential. You can simply use glue for sticking the flowers and leaves.

I also added back stitch detail to the flowers and leaves using embroidery thread. Here is a picture of the finished photo frame after sticking the felt flowers and leaves.

Add a picture and you special gift is ready. (The picture I have used is a cut-out from Parenting magazine.)

This is a very simple project but making it yourself and adding a photograph capturing your special moment with the person who will be getting this gift makes it personal and all the more special.

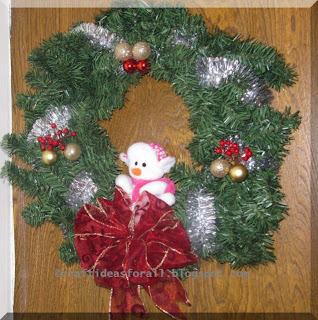
Snowman Christmas Wreath


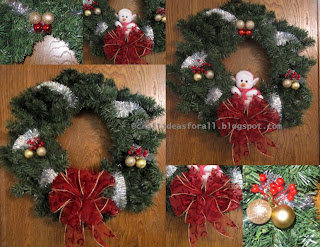
Last night when I was back from shopping and was unlocking my front door it looked plain. That inspired this Snowman Christmas wreath. Luckily I had the plain Christmas wreath from my last visit to Michaels. This Snowman wreath is result of the supplies I already at home. Thanks to my various projects earlier.

Supplies you need
-Christmas Wreath (not decorated)
-Wired Ribbon or Bow
-Wire
-Snowman toy
-Christmas Ornaments Gold color
-Berry bunches
-Garland -Silver

The bow is made by making loops of the wired ribbon holding it between your thumb and index finger and then winding a wire at center. Cut the ends as shown in the pictures. The ornaments and the berries are joined together using wire and then tied on the wreath. Snowman is also fixed using wire. Pierce two holes about 1 inch apart at the base and pass wire through it. Use the wire ends to tie them to the wreath. The beautiful Snowman Christmas is ready to be hung.

Tip: You can decorate your wreath with pine cones, different colors of ornaments anything that you feel adds to festivity. Gold, Silver and Red colored ornaments are the most popular ones.

Monday, December 21, 2009

Simple Christmas Wreath


This simple christmas wreath is easy to make too. You can use this for your christmas decoration in multiple ways. As a Christmas wreath on your front door or to make your existing decoration extra special. I have used this as a decorative base to my wedding ring holder. You can use this as decorating any ceramic piece of art, eg a ceramic fairy.

Supplies you need:

Chrismas wreath (readymade basic)
Double crepe paper - Red
Pollens
Floral Wire- 12 pieces of 2 inches
Scissors
Glue

Plain green christmas wreath is available in craft stores in various sizes.
For making this Bouganvillea wreath you will need 12 bouganvillea flowers. You can increase the number of flowers if your wreath is bigger.

For making one Bouganvillea crepe flower you need to cut 3 petals from red double crepe paper.
Use the template in 100% size. As explained in detail in some previous posts attach pollen to the floral wire. Now using your thumb curve the cut petals outside. As shown in picture attach 3 petals around the pollen using glue to make one Bouganvillea flower. Repeat to make the rest of the flowers. At equal distances fix the flower on the wreath by winding the floral wire around it. The simple yet beautiful Christmas Wreath is ready.
Have fun and Merry Christmas.

Thursday, December 17, 2009

Kitty Cat Refrigerator Magnet


Today was like one of those days when I end up making a quick and cute craft with my daughter with no previous plan. In fact I must say she was the one who inspired me for this craft. She has a Hello Kitty purse and said draw Kitty cat. She was not impressed by my drawing of it on Doodle Pro. She then said make Kitty cat.
Just like a flash I got an idea of creating a Refrigerator Magnet of Kitty cat inspired from the cute face of famous Hello Kitty series. This is how I made this craft with my 23 month old daughter.

Supplies you will need:
-Air dry clay white
-Acrylic Paint: Red, White, Yellow and Black
-Painting bush
-Craft Glue
-Magnetic strip
-Craft knife or Scissors
I used one pack of Crayola Model Magic Single packs. Just follow the illustrations to make this project. It is that simple. Detailed step wise instructions to make Kitty cat craft :Just in case you need them.
Use the existing width of the clay pack (roughly 1 ½”) cut a length of about 1”. Use the existing thickness of the clay (roughly 1/3”). If there are cracks use little water to moisten it and then you might want to roll it to a rectangle of 1 ½” by 1” and thickness of 1/3”.
To make two ears take around 1/4 inch diameter ball of Crayola Model Magic clay and then shape it like a pointed triangle. Use the rest of the clay to make the bow. Add two drops of acrylic clay to make it pink. Mix it well. Bow is made by sticking 3 pieces together. To a small ball of clay attach two ends of flattened clay as shown in the picture. The completed bow measures around 1”. Glue the ears and bow to the face. When dried (about 1 hour or so), paint the bow in any color you like. Paint the eyes, nose and the whiskers. You can make this completed Kitty cat face as a Christmas tree ornament using a hook or a refrigerator magnet by sticking the magnetic strip piece on the back. Voila! the cute Kitty Cat craft is ready for your toddler to enjoy.


Tips- With a little adult supervision Toddlers can enjoy this craft. It is okay if they smudge the paint a little. Idea is they have fun.
- If you do not have magnetic strip you can use the back of any other magnetic sample credit card or business card you get in ad mail. I used the back of a Subway Sandwich address card. Just peel the ad part with craft knife and what you get is self sticking magnetic strip.

Tuesday, December 15, 2009

Festive Theme Handmade Clay Flower Arrangement


I love making clay flowers. This flower arrangement is one of my favorites. It has just one rose but its simplicity is what appeals to me. The colors red and white remind me of the festivity of Christmas and Snow in winter season.

Following supplies are needed for the project :

- Air dry clay - Red, White and Green( I used Deco brand colored clay for red rose. You can add color to white air dry clay to get the colored clay)
- Floral Wire and Wire cutter
- Red Pollens
- Floral tape
- Pointed clay tool or a bamboo skewer or a toothpick (for white flowers)
- Acrylic or any water based paint (to color the clay)
- Scissors
- Flower vase

Refer our previous posts on clay flowers for instructions to make clay roses, cherry blossoms and the fillers. The only difference between the white flowers and the cherry blossoms illustrated in previous post is that I have not cut notches in the petals. Make sufficient number of white flowers to surround the rose in the center. I ended up making 16 of them. Add the green fillers and leaves to complete the arrangement.

Hope you get inspired to make one this festive season. Mine is proudly displayed as a center piece on our dining table.

Sunday, December 13, 2009

Quick and Easy Handmade Christmas Photo Ornament


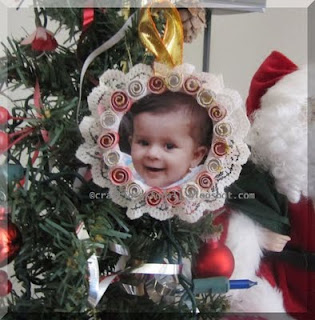
Like many of you I have already set up the Christmas tree and the lights are already twinkling. Every year I decorate the tree in my own way. Yes, you guessed it right - most of my ornaments are handmade. This year I made one with my daughter. She was more excited about this quick and easy Christmas photo ornament. Excited because it was her photo that I was about to put. The photograph we chose is the one where she is mere 6 months old and giving that perfect smile. I suggest you let your child pick their favorites if they are old enough to do so. Let me walk you through this project quickly.

Supplies you will need:
- Card stock white
- Child's photo
- Scissors
- Glue
- Paper Quilling strips : white and red
- Glitter
- Ribbon : Golden color
- Paper quilling tool or barbecue stick

This is a very easy project.Cut the photo into a 2" diameter circle and the outer card stock into 2 pieces of 2.5" diameter circle.

The lace is glued using all purpose glue. As it is a circle, making little pleats make the work easier and neater. I have used the easiest of the paper quilling shapes - the coil. Alternate red and white quilled coils are used to make the border.You can use any shape you like.You can have a look at our older posts on Paper quilling for basic shapes. I added glitter to the coils to make them more festive.

Follow the step by step illustration to complete the project.


Give the ornament to your kid to hang it on his/her favorite spot. Every-time my daughter looks at this ornament she is so delighted and says " Mommy made it", "Nice".Believe me it is the best compliment you can get for your craft project.

This project is worth a shot this Christmas. Happy crafting and Merry Christmas to you all!

Tip: Photo ornaments are better with pictures of close up faces.

Monday, December 7, 2009

Festive Craft: Red Rose Paper Flower Arrangement in Silver Basket


This is one of the simplest and cutest craft I made. Simplest because I keep making roses. Once you get a hang of it they are not as difficult as they seem to be. And this is something I made very quickly,without much thought and my hubby loved it. This is one of his favorite ones.

This festive craft is perfect for Christmas as I have used the famous green Christmas bushes,silver basket brings the festivity and red roses add the love.

Supplies needed :

- Basket preferably silver
- Styrofoam -green
- Double crepe Paper -Red
- Green Christmas Bushes
- Glue
- Floral wire
- Floral tape
- Scissors

Prepare the basket by cutting the Styrofoam equal to the size of the basket base. Make sure that it is little lower than the top of the basket base. Fix the Styrofoam inside the basket. You might want to use glue to make it more secure.

Make five roses as shown in the earlier post of Paper Flower Arrangement. Keep the stem half inch longer than the depth of the basket so that the flower is little higher than the rim of the basket when you insert it in the Styrofoam.

Once the flowers are ready, trim the Christmas bushes such that they look like leaves when inserted in the Styrofoam. Insert the bushes till the Styrofoam is completely covered. Then
insert the roses as shown in the picture.
All the supplies are easily available at Michaels Arts and Crafts and the Castle in the air online store.Your lovely Festive craft is ready. You can decorate your house with it or gift it to someone special.

This Christmas do try this. Have fun.

Thursday, December 3, 2009

Keepsake Baby Shower Favor Boxes


This one is a very personal project. I wanted to add a personal touch to the favors for friends at my baby shower. I decorated these favor boxes using paper quilling and border punches.

The baby rattle was made using paper quilling. Once I figured out the design for the rattle making multiple ones was not that hard. The first one took quite some time to complete. I also added jingle bells to the rattle for added interest. The blue lace on top and bottom was made using card stock and Martha Stewart's half daisy edger punch.

You can use pink/blue theme for rattles too. I only used blue lace pattern in the boxes for unifying the box decoration with the theme color. Following is another picture of the favor boxes with kids favors at the baby shower venue.


My friends loved them and so do I :). I have kept one for myself too as a souvenir of the special day.

Tuesday, November 17, 2009

Celebrate Thanksgiving with Turkey Craft


Here is a quick and interesting Turkey craft I created using mixed media. I used Origami paper and foam sheets of various colors. It can be used as simple decoration, a centerpiece on Thanksgiving dinner table or as a place card too. All you have to do is to make more of them and add the name tags to it.

Supplies required:
- Origami Sheets 7" square- Orange, Yellow, Brown and Dark Pink
- Self sticking foam sheet- Brown, Red, Yellow and Maroon
- Glue
- Scissors
- Craft knife
- Scotch tape
- Wiggle eyes

To make the Turkey craft the first step is to make accordion folds of all the Origami sheets. Fold them in half as seen in the pictures. Now cut the orange sheet from the center. For this Turkey craft we need just one part of the cut orange sheet accordion.


Arrange the sheets as shown in the picture and stick it with glue or scotch tape. Feathers for the Turkey craft are ready.

Now take the brown foam sheet and measure it so that it reaches two thirds of the height of the turkey feathers. Refer the step by step instructions and cut out the body of the Turkey. Also, cut out the other parts using different colors of foam sheets.

Assemble the foam cutouts to make turkey's body. Once done, glue the wiggle eyes.

Now glue the foam sheet body at the center of the feathers. The easy Turkey craft is ready to be used as a piece of wall art, centerpiece on the Thanksgiving table or a place card. Happy Thanksgiving!

P.S. : Yay! This is our 50th post already :). Hope you all are enjoying them as much as we are !

Monday, November 16, 2009

Framed Fall Leaves Craft for toddlers

Now, when Fall season is at its peak, it is the best opportunity to take some time and help your toddler create a fall craft which he or she will cherish for many years to come. Kids get excited by collecting these lovely fall leaves during this season. Many of you might be preserving them and some of you might be throwing them after your toddler has played enough. You might think they are too small to create a fall craft but believe me they have much more potential than you think. Help them explore by creating this fall craft for toddlers. The skill level required for this is perfectly suitable for a toddler. I tried making this with my 21 month old baby girl. She got so excited by collecting the leaves and when we started making the craft I could sense the feeling of achievement and satisfaction at the same time.
Doing something independently is so fulfilling for them and their expression priceless for us. Highly recommended to try with your toddler.
Here's how you go about creating it.

Supplies needed
- Fall leaves -Your choice of bright color medium size or rather your toddler's choice
- A thick book-To flatten and dry the Fall leaves.
- Glue stick
- Card stock- Any contrasting color with size that will fit in the leaves and leave some space at border.

Yes, this is pretty much all that you need.
Try to show your toddler how it will look once he or she has glued it on the paper.
You might let them decide the pattern if they show interest.
Once decided take the leaf and apply glue on the back side. Stick it on the card stock at the place you decided. Tell them to press it firmly. It is possible that your toddler changes his mind and sticks it somewhere else. This is absolutely fine.
Refer the picture.

Allow some possibilities of imperfection or leaves getting broken or change of design. The whole idea of this craft is to make your toddlers happy and help them learn some things in the process.

Tips: If the leaves are really fragile then it is a good idea to have the glue applied on the card stock directly and then press the Fall leaves over it. Bright red and yellow leaves turn out to be really nice.

Frame the art to make it look more professional and last long too.
Have fun.

Tuesday, November 10, 2009

Fall Leaves Spray Painting Wall Art

It is almost the end of Fall here in US. Couple of days back when I was taking a walk with my little daughter she picked up some fall leaves. She kept playing with it and was so excited. It was the first time she did it on her own. This is what gave me inspiration for this craft. Spray painting is one of the easiest and interesting craft for kids. For the basic technique you can refer our older posts.

Fall leaves have vibrant colors and are very beautiful. They are perfect for using as a stencil for spray painting. It is a good way to add color to your walls even after fall.

Supplies required for the project

- Fall leaf of your choice
(A single medium size is what I picked)
- Card Stock-2
- Old toothbrush
- Acrylic Paint (Any water based color will do)
- Craft knife
- Pencil
- Color Markers

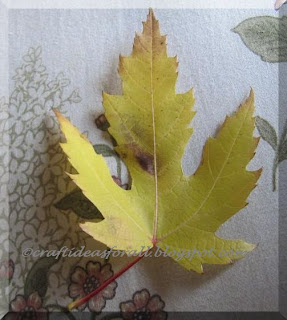
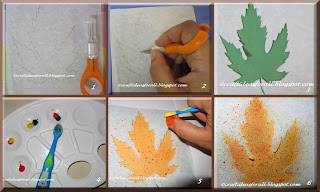
Keep the leaf on the card stock. Draw the outline. Using craft knife cut out the leaf. This will be your stencil. Refer the picture. Now dip the toothbrush in the color you want to paint your leaf. Put the stencil on the second card stock. Spray paint with the toothbrush. Once done draw the outline using a marker. Frame the art if you feel like. Parents should assist kids while handling the craft knife.

Tip : For younger kids if you want to avoid cutting out the stencil, use the leaf as a stencil and spray paint the rest of paper you will still have a beautiful painting.

Also, if the the leaf you selected is not perfectly flat, keep it inside a thick book for one day and you will have a perfect leaf to make the craft.

Tuesday, November 3, 2009

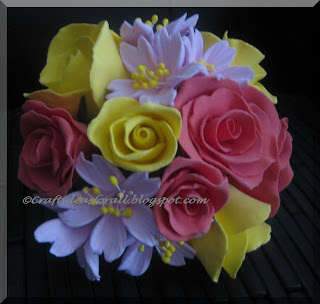
Handmade Clay Roses and Cherry Blossoms

I have made clay flowers and gifted them to many of my friends but somehow never made one for my parents. They are visiting soon and I thought to make a flower arrangement for them. This flower arrangement has roses and cherry blossoms. Following are the supplies required for this project :

- Air dry clay
- Floral Wire and Wire cutter
- Pollens
- Floral tape
- Pointed clay tool or a bamboo skewer or a toothpick (for cherry blossom)
- Acrylic or any water based paint (to color the clay)
- Scissors
- Flower vase
- Ribbons ( I used them to decorate my vase)

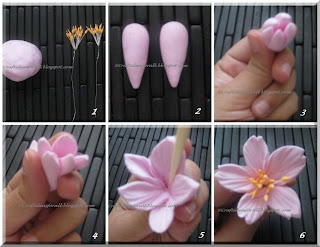
You can refer to my previous post on clay roses to get the details on how to make roses. Here are the step by step instructions to make cherry blossoms. The supplies needed for cherry blossoms are shown in the picture.


Take a ball of clay and add a tiny drop of pink color in the ball. Mix it thoroughly till the entire ball gets a uniform color. Now make a small ball of 3/4th inch in diameter and taper it at one end to get a tear drop shape. Using pointed scissors make a cut slightly away from the enter of the tear drop. Now slit the smaller section into two and the bigger one into three.


Now using the pointed clay tool / bamboo skewer spread out each petal as shown in the picture. Support the petal with your finger while spreading it out. It may take you multiple tries to get a neat petal but once you get the knack of it you will be surprised how easy it is.

Take a bunch of pollens and twist wire around them as shown is the picture. You may prepare multiple sets of pollens before hand so that when you are making flowers you save time and hence prevent clay from drying. If the clay still gets dry, you can add a drop of water it to prevent cracks.

Insert the wire with pollens at the center of the flower and pull it down. Make tiny notches at the tip of the petals ( you may skip this step) to finish of the flower.
Leave it to dry. Before adding them to the flower arrangement wrap floral tape around the flower stem. These flowers look very pretty and can be used standalone or in an arrangement with other flowers.


For the vase I used a small wicker basket and decorated with ribbon and pearl. I preferred the wicker basket as it would not break during travel when my parents take it back to India.I loved the final flower arrangement especially the cool spring like colors.

Hopefully you enjoyed this tutorial and will get inspired to make these flowers. Here is another picture of the finished arrangement.

Wednesday, October 28, 2009

Origami Bat : Wall Piece for Halloween Decoration

After I made the Owl wall piece using the Origami technique, I felt like creating more of the kind. With halloween round the corner it made me all the more excited to do this. Here comes the Spooky Bat wall piece. I must say this is much easier than the Owl and they look great together.

Supplies I used:

- Origami paper (double shaded not mandatory though) 7"
- Foam sheets (self sticking): Brown, Glitter-- Red,Silver, Green
- Scotch tape

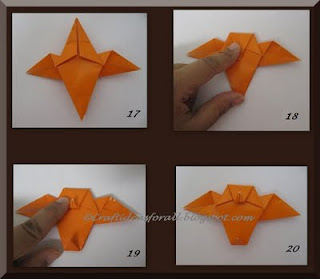
Follow the steps in the pictures below. Refer to basic techniques for origami discussed in previous posts.


Add eyes and mouth to the bat. Hang the Bat upside down as they are usually hung upside down. Use a dark blue background to depict dark sky. You can create the background with moon or flowers too. It is all upto your taste.

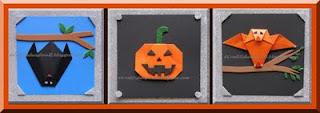
I have used Silver background to make the Halloween series as a set.They make lovely wall decorations for my kiddo.Here is a picture of the set.


Happy Halloween to all. Have fun.

Origami Owl : Wall piece for Halloween Decoration

Creating this cute Origami Owl as a wall decoration is lots of fun. It is an interesting activity for a little older kids. If you have tried origami earlier it is a bit easier. You can refer to earlier posts for little simpler origami ideas.
However, for Halloween it is a must try.

Supplies required:

- Orange Origami paper 6"
- Self sticking Foam sheets Brown,Black and Glitter green, Glitter silver
- Craft Knife
- Black Card stock for background

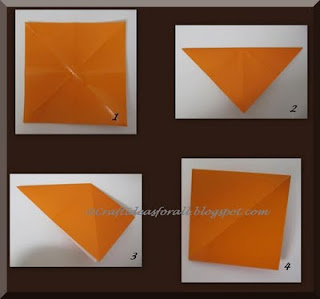
On a clean hard surface fold the orange origami paper as indicated step by step in the picture. It is important to make folds in one go as the paper is usually a bit fragile. I have used Melissa Doug Origami Paper.

To make the folds little easier fold the paper in half horizontally and unfold, then fold is vertically and unfold and then fold and unfold both diagonals too. Make crisp crease in every fold. This will make the rest of the folds easier to make.
Now with the square paper and the white side up. Fold the paper diagonally so that you can see the orange color now. Refer the picture.Next step is to lift the corner and do the squash fold. You get a square as a result. Turn and repeat the step.


At step 5 keep the resulting square as shown and fold the left and right sides of the top layer at the center you get you have a diamond shape. Turn over and repeat the steps. Fold the rest of the part also as shown.


Now lift the top layer so that it opens up. Follow the crease and keep pulling gently till the left and right sides meet at the center. Refer to the picture. Make a good crease. Turn over and repeat. Now lift the tip and fold it half way as shown. Flip and repeat.


Fold the left and right sides towards in such a way that it still remains a diamond shape. Turn and repeat on the other side too. The are two free pointy ends which we will use to make wings. Pull out this free end gently and away from the body. Refer the picture. Do this for both free ends.


To make the head fold the top part half way and then fold the tip again to make the beak. For making feet fold around 1/2 inch both in the front and in the back.


Once the Owl is ready cut out the branch of the tree as shown in the final picture and some leaves. You can use your imagination and create a scenery. You can add some flowers too.

To give it a framed appearance I have used Glitter silver self sticking foam. Foam sheets are easily available in craft stores like Michaels or even in Walmart.

The fabulous Origami Owl wall decoration is ready. Enjoy Halloween to the fullest.

Tuesday, October 27, 2009

Origami Jack O' Lantern for Halloween Decoration

Any Halloween decoration is not complete without the Jack O' Lantern decoration.This year I have tried to create a simple yet wonderful Origami Jack O' Lantern wall piece. Its an inexpensive, easy craft for kids and other family members to create and enjoy. You can use the Origami Jack O' Lantern even without the background and make many of them and display on wall or windows.
I am creating this for wall decoration and as one of the pieces in the set of three Origami Halloween Wall Pieces.

Supplies needed:
- Orange Origami Paper 7"
- Card Stock Black
- Self sticking foam sheets: Glitter green and black and Glitter Silver
- Craft Knife
- Scotch Tape

Follow the instructions for basic origami techniques as discussed in previous posts.
Following pictures show the step by step instructions to make the Origami Pumpkin.
Once you have made the basic pumpkin shape, using craft knife cut out the eyes, nose and the mouth from black foam sheet as shown in the picture.
Also cut the green glitter stem and the corners (using silver glitter foam). Refer the picture and stick them on the card stock.

The cute and easy to make Jack O' Lantern is ready.I added silver foam sheet with glitter as base to give the project a more finished look. Parents must supervise kids when using craft knife.

Tip: You can use different size of Orange Origami paper and create different size and kinds of Jack O' Lantern to make a bigger wall piece or window decoration.
Have fun.

Craft with Pencil Shavings: Clown


This is final one in the series of craft with pencil shavings for kids. This clown will surely make the kids smile.

Following are the supplies you need :
- Pencils of various colors , pencil sharpener
- Card Stock (for base)
- Colored paper (for face, hat and hair)
- Pencil colors or crayons
- Glue and Scissors
- Wiggle eyes

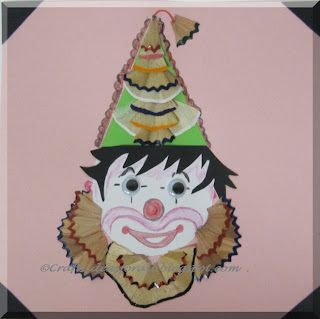
Cut out the face, hair and hat of the clown from colored paper as shown in the pic.Glue them together to make the base of the project.
Add the wiggle eyes and make the clown's dress using pencil shavings. Also decorate the hat with pencil shavings. Color the face using pencil colors or crayons. You cute looking clown is ready to spread smiles :)


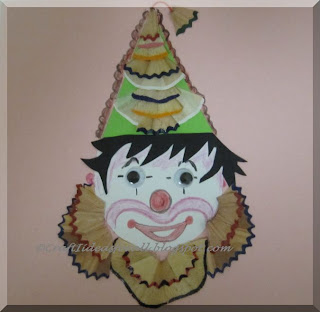
Here is a picture of all four of them together as a wall piece.