Friday, August 28, 2009

Perfect Origami Crane

Origami- The Japanese art of Paper folding is something that fascinated me from so long. During my visit to Japan couple of years back I could really appreciate the beauty and the art of folding paper. Its now that I really found the time to learn it on my own. The Japanese Papercrane or ORIZURU is famous throughout the world. It is a symbol of origami, and a symbol of peace. An ancient Japanese legend says that whoever folds 1000 cranes will be granted a wish.Here comes the perfect Origami crane pair made by me this morning itself. If you are looking for a quick craft basic Origami is your answer. You get good results when you get a hang of it. It is great for kids too. Makes a good decoration for study table or your working table too.

Material needed
6"x 6" square Origami Paper of any color you like.

Technique
Its a sequence of folding the square paper. Believe me it is not as difficult as it looks. By simple folds you can make this amazing crane.
If you are trying it for the first time and do not have Origami paper you can begin with cutting a square paper approx 6". The nearest texture or thinness can be obtained from a shining paper of an ad magazine you might be receiving every week.
So get started.
The video I used is the video on you tube. Only difference is that I used colorful paper rather than white.

Resources
Amazon.com Melisa & Doug 51 premium sheets, 17 vibrant colots including Metallics and Flourescents

Need Inspiration to start: An amazing article with quick guide to learn Origami over internet. It has lots of tutorial videos and will blow up your imagination when you see what all you can make by just folding paper.

Click


Do try this amazing art for sure. Enjoy and have fun. Share your experience too.

Tuesday, August 18, 2009

Handmade wood rose arrangement

This is one of the most liked creations of mine in one of the Craft festivals in UK.
It is unique and works best when you want to achieve festivity along with a rustic feel.This wood rose arrangement uses a slightly different technique than the usual double crepe flowers I create.

Materials you will need :
For Bud and Flower
Double crepe paper - White and brown
Wire 18# and 30 #
Glue
Floral Tape
Scissors

Stamens
Double crepe paper- white and brown
Cotton ball
Wire
Glue
Floral Tape

Flower Arrangement
Vase
Oasis floral foam
Gold painted dried stem or any variety of dried stem looks good.

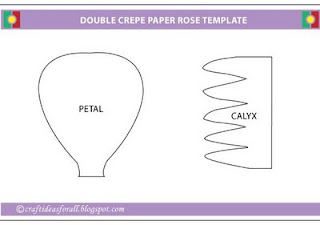
Refer to the template and cut out 3 small petals for one bud, 3 small petals and 5 big petals for one flower. Cut 6 rectangular pieces in contrasting color than as of petals. Refer the picture.

Begin with making stamens. Take a small piece of absorbent cotton ball around 1/2 inch in diameter. Stretch the rectangular crepe meant for stamens and put the cotton in the middle. Holding the ball twist the 30# wire around the neck of the ball.Wind it downward. Cover the wire with floral tape. Make 3 each for bud and flower.
Hold 3 stamens together and bind it together with wire and cover with tape. Make two sets of stamen.
Hold the petals with two hands, using your thumb stretch the petals to make concave effect.

For bud using glue arrange 3 small petals so that two petals overlap one. Once it is dry cover the wire with floral tape.

Make a similar bud and then arrange 5 large petals around it and fix the base with glue. Once dried finish it with floral tape.All the supplies are available at art supplies store like Michaels, Joann, Wal-mart. Wide variety of double crepe papers are available at the link provided above.
Depending on the size of the arrangement you want to make decide how many flowers you need.Arrange the buds and flower in a vase which has floral foam in it. Make sure the foam is not visible from outside. Use dried gold painted stems as fillers.
Amazing wood rose arrangement is ready to brighten your house.

Paper bamboo : Excellent idea to recycle paper for craft


Well, we all know you can get paper from bamboo. What about making bamboo from paper :). I get plenty of paper ads in my mail every day and it directly goes to the recycle bin. This idea uses the same paper to create beautiful art. If you are doing this one with kids it also encourages them to recycle. Not to mention this is really inexpensive to make.

You need the following supplies :

- Paper ( Could be from advertisements or regular news paper. The idea is to recycle.)
- Bamboo skewer for rolling the paper ( You can use any similar object like knitting needles)
- Glue
- Scissors/paper knife
- Acrylic paint and paint brush
- Any base for your craft
As shown in pictures roll the sheet of paper using the bamboo skewer and apply glue at the end to secure the paper. Remove the skewer at end of rolling the sheet of paper.
This is the basic technique. Takes less than a minute to roll one and your paper bamboo is ready.

You can use it for many craft projects like pencil stands, flower pots, keepsake boxes,jewelery boxes, photo frames etc.

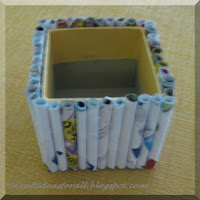
For illustration I used them to make a rectangular flower vase and accenting few of my photographs. I used a rectangular cardboard box at home for the base. Ready-made unfinished boxes are also easily available at craft stores like Michaels and Jo -Ann.
Simply cut the paper bamboos to the required size and glue them on the base.Keep glue handy when you are cutting the bamboos as the edges might open and you may need to re-secure them with glue. Another way to avoid this from happening is to apply glue few times in between, while rolling the paper instead of applying it just at the end.


Once I glued the bamboos I painted them for a more uniform look though they looked pretty even without the paint :). Let the paint dry and the flower vase is ready to use ( See the picture above). This could be a stationary caddy too!

This is a picture of the photographs I accented using the paper bamboos. I used ribbons to attach the two pictures and to hang them on the wall.

Monday, August 17, 2009

Paper flower arrangement


Making paper flowers has been my passion since I learned this art during the summer break before joining college. I did incorporate my imagination to the basic art I had learned. Its amazing how you can create amazing pieces of art once you set your heart into it.
This creation was inspired by a fresh flower arrangement recently given to one of our neighbors on her 50th birthday.

Material
Double crepe paper - Pink color 1 sheet for petals.
Double crepe paper - Green color for calyx
Floral tape
18# wire - 5 pieces each about 6 inches long
Wire cutter
Glue
Pebbles - about 2 bags
Round transparent glass vase
Baby breath flower stems artificial - 2

All the material is easily available at craft stores like Michaels.
To make rose first cut out the petals as per the template.
For one rose you will need about 11 petals. Take the stem, roll one petal entirely on the stem at the center using glue. Its better to use a painting brush to apply glue. Add the next petal making sure its opposite to the previously added petal. Once you have fixed five petals and it starts looking like a rose bud which is just starting to open, take another petal roll the sides using a toothpick. Fix the rest of the petals in such a way that they face each other and on putting the last petal it looks like a complete rose. If you feel the rose is complete after fixing the 10th petal there is no need to put the 11th one. Make sure height of all the petals are same.
Turn the flower and fix the calyx on the stem. Calyx can be cut using the template on the green double crepe paper. Fix it using glue.
Cover the stem using floral tape. Make the rest of the 4 rose flowers using this technique.

Now fill the glass vase with the pebbles, keep a little aside for later use.
Put one rose in the center and rest four on the sides in a symmetrical pattern. Fill up the vase with baby breath stems. You might have to cut the branches based on the height of the vase and to use as a filler in the arrangement. Once done, fill up the vase with rest of the pebbles to give a perfect finish. Your arrangement is ready. Enjoy your morning with the lovely roses at your breakfast table.

Sunday, August 16, 2009

Pencil Sketch--Easy and inexpensive craft


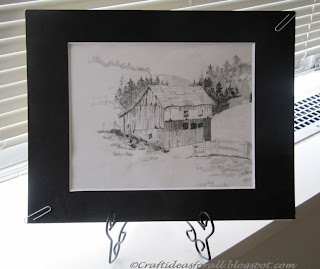
I was always fascinated by the art of sketching. Never got the opportunity to learn it formally. Recently while going through the craft books at library I landed upon a pencil sketch basics book. I did not have much of the tools they recommend but had the basic pencils HB, 2B,2H and A4 sheet. I just tried to give it a shot.
It took a while but I think I did good considering it was the first attempt. I framed this with a simple black border paper frame bought from Walgreens, used U pins to fix it and put it on the stand bought from Walmart. After that it really looks a professional piece of art. Got a lot of appreciation from friends. Give it a try. Its very fulfilling.In all a craft is ready under $10.

Thursday, August 13, 2009

Easy spray painting craft for kids

Kids love to paint and get their hands messy with them. This is a great idea for beginners and can be extended to make complex designs as well. Whether the kids do it independently or with their parents simply depends on how old they are.
I used the following supplies :
Card stock
Thick paper sheet to cut out patterns
Scissors
Acrylic paint ( you can use any water based paint)
An old tooth brush

I simply drew some animal patterns on a thick sheet of paper and cut them out.
For younger kids ( Ages 4 and below I guess) you may have to do this for them. Or you can just get ready made patterns or print them out from internet if that suits you.

Arrange the pattern on the card stock as shown in the picture. If you find it difficult you can fix it with a paper pin for the spraying part.
Take some acrylic color on your paint dish. Wet you toothbrush with water and then wipe away access water using a paper towel. Dip the tooth brush in the paint ( do not take too much color otherwise the spray will have large spots) and run your thumb across the bristles to spray on the card stock. Continue till all of the card stock is covered with paint. You can use multiple colors also to create patterns. Be careful to cover the surface you are working on with paper towels or any plastic sheet as the paint will spray outside of the card stock too.

Let the paint dry and remove the cutout pattern. Yay...your card is ready, If you want you can outline the pattern with marker or leave it as it is. It totally depends on the pattern and your taste.

This is a great and inexpensive idea to keep kids entertained on play dates too.

Wednesday, August 12, 2009

Aquarium Background Screen- Amazing craft for toddler


This one is the latest creation we have had in our home. Credit goes to my husband and my 18 month old daughter. This weekend we were trying to keep our 18 month old busy.
Craft Supplies required—
Construction Paper in bright colors –2 for a 10 gallon Fish tank
White A4 sheet—1
Washable crayons
Self adhesive Foam sheet or stickers –any contrasting color
Glue stick
Scotch Tape
Scissors

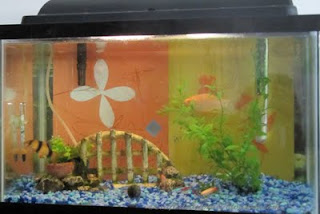
She was drawing with washable crayons on bright construction papers orange and yellow. Later she put glue on petals of a simple flower cut from A4 sheet. Parents help your toddler to cut with scissors. She also used some flowers and butterfly cut from a contrasting self adhesive foam sheets. You can also use the foam stickers available in all kinds of shapes. Decorate these two construction papers. Let your toddler use his or her imagination. You might have to maintain the interest by encouraging them by talking with them through the process. Once its ready its time for parents to step in and fix the paper using scotch tape at the background of the fish tank like you would fix a store bought screen. It makes an amazing craft which brightens up the Fish tank as well as the room. Do not forget to write your toddler’s name to their creations. My daughter was so excited that she can see her flower through the tank and she thinks the fish in the tank are kissing her flower. Everyday when she wakes up it’s the first thing that she goes and looks at. Such simple crafts can be so rewarding to parents as well as toddlers who made it. At such a young age it gives them the feeling of accomplishment and helps develop their creative side as well. One should try it for sure .

Tuesday, August 11, 2009

Quick Framed Art


When I bought bedding set for my newborn I found that the set includes Valance which I could not use as I live in an apartment and it has huge windows so it won't fit anyways.
The whole bedding set was utilized optimally except this valance. As my baby grew a bit older and started looking at things close by with great interest I realized since the valance has great embroidered patch work of Lion and Elephant it will make great wall pieces and will interest my daughter a lot if place on the wall.

Quickly I cut out two separate pieces one each of that of lion and the elephant embroidery. After measuring the size of the final art piece with a measuring tape I kept about 1.5 inches on all four sides and cut out two cardboard pieces. I used the box of a recently bought toy for her.
The next step was to cutout strips of self adhesive foam sheets.

I selected fluorescent green as that was the base colour of the bedding set and seemed to go well with the design. I had bought these foam sheets from Michaels. If the color you like is not available in self adhesive foam sheets you can use the regular foam sheets and stick them with glue.
Its best to cut the foam sheets using craft knife. I used Fiskars Fingertip Craft knife
Once the frame is ready the last step is to put the hanging cord. I used a beautiful cord I had kept from one of the gift bags received. You can use any other thick cord or ribbon for this purpose. Cut a piece of about 3inches. Now, on the back of the frame mark two points about 1.5 inches apart so that its the center of the frame. Place the cord there and fix it using tape. You can use scotch tape or double sided tape for this purpose. Michaels is a great place to shop for craft supplies. Usually the things that I use are the basic things you will need to make most of the crafts so its a good idea to have the various kinds of glues, ribbons, tapes in stock.
Once the cord is attached then you can hand the framed art to a place where its easily visible for your baby to look at and enjoy.