Tuesday, September 29, 2009

Paper Quilled Garba Dancers


Navratris are over but the festivities are still on. We have lived in Gujarat for many years and the atmosphere during Navratris is simply amazing. People of all ages get dressed in traditional attire and dance to the tunes of Garba (Dandiya) during these nine days and enjoy to their fullest.

Luckily here in US we get to watch or do Garba also, though its generally only on weekends. This year I did not get a chance and felt something was missing.Then I decided to make these male and female Garba dancers in traditional attire with paper quilling.

Supplies I used for this project :
1) Paper quilling strips
2) Quilling tool (slotted)
3) Glue and scissors
4) Card Stock for the base
5) Shadow box (if you want to frame it)

The basic outline is a common embroidery pattern. You can refer my earlier posts on quilling to get an idea of how to get the basic shapes with quilling.

It took a while to figure out how to make it using quilling but I love the final result. It definitely made up for my not getting to do Garba this year. Hope you like it as much as I do :).

Sunday, September 27, 2009

Beautiful flower bouquet in fall colors


We have recently moved and it has been really difficult to find time for my craft projects. But it was my friend's birthday this weekend and I wanted to gift her something handmade. Its beautiful here these days with leaves changing colors and I got inspired to make something that brings these beautiful fall colors outdoors inside the home.

Following are the supplies you need for the project :
- Double crepe paper (Orange)
- Pollens ( Black)
- Floral Wire
- Floral tape (green)
- Wire Cutter
- Fall Bush ( I used purple. you can use any contrasting color)
- Leaves and other fillers
- Glue and Scissors
- Ribbon to finish the bouquet
- Cellophane paper or any transparent gift wrapping paper


Refer the picture above for step by step instructions. ( Click on the pic to get a better view) Take a bunch of pollens and attach them to the wire (stem) using floral tape. Cover the wire with floral tape too. Now cut 8 petals out of the orange double crepe paper (duple paper) for each flower. Refer the image for the petal shape. Stretch the petals to give them a concave shape. Arrange the petals in pairs. Then arrange them overlapping each other around the pollens attach them at the bottom using glue. You can make as many flowers as you want. More the merrier :).

Use the purple fall bushes as fillers and arrange the flowers as shown in the picture. Finish the bouquet by taping all the stems together using floral tape. Add the cellophane paper and a beautiful ribbon bow. You have a beautiful fall theme bouquet ready. Here is another picture of the finished bouquet.

Saturday, September 26, 2009

Beautiful clay roses

I made these roses for a friend who had invited me for a ladies only tea party. Daddies took care of the kids while the ladies enjoyed a sunny afternoon and lots of gossip over tea and snacks.It was a lot of fun.

My original plan was to make the arrangement in a pretty tea cup ( to go with the theme of the party) but I couldn't manage to get one in time. So it ended up in a glass vase.

Supplies used to make the arrangement :
- Delight air dry clay
- Floral wire
- Floral tape
- Glass vase
- Green marbles
- Fillers ( fall bush)

To make the rose :

Make seven 1/2 inch dia. clay balls. Use your thumb to press them into the shape of the petal.You can refer the template in this post for the petal shape. Take another clay ball and shape it like a tear drop. Keeping the pointed side up, completely wrap one petal around the teardrop so that you can not see the teardrop. Take the second petal and start wrapping it overlapping the first petal half way through. Add the remaining petals in a similar way.

Make seven more clay balls little bigger than the previous ones and press them into petal shapes. Add these petals similarly, this time flaring the outer edges a little for a open rose look. Remove extra clay from the bottom. Let the flower dry for 24 hrs.

Take a floral wire and cover the tip with glue. Insert it into the flower after it is dry. The clay becomes lighter after it dries. The wire won't be able to take the load when the clay is wet. Wrap green floral tape around the wire to finish the flower.

Add a drop of green color to the clay and mix well. Make tear drop shapes and using scissors slit them halfway to get the filler bud. Insert wire at the bottom and let the buds dry. Take three buds together and wrap floral tape around the stems. I used almost 12 buds for this arrangement.

Arrange the flowers as in picture.Use fall bush or any other fillers you have to give the arrangement a fuller look.Fill the glass vase with marbles.

An adorable arrangement of roses is ready for you to enjoy.

Thursday, September 24, 2009

Spooky Spider for Halloween


Halloween is coming and kids love to scare their friends with spooky stuff during Halloween. Here is a quick and fun craft idea for kids to make during Halloween.

To make this spooky spider you need following supplies :
- Black yarn
- Black chenille stems or pipe cleaners
- Wiggle eyes
- Glue and Scissors
- A piece of cardboard
- Clear plastic string ( If you want to suspend the spider)


Keep aside a 6-7 inch yarn piece. Wrap rest of the yarn around the cardboard piece. Remove the wrapped yarn and using the yarn piece you kept aside, tie a know at center of the spool. Place the chenille stems across the spool as shown in the picture and tie more knots to secure the chenille sticks. Click on the image to view a larger picture. Using scissors slit the opposite ends of the spool to get a pom pom. Kids may need help in this step. You may leave the pom pom as is or even out the look using scissors.

Bend the chenille stems to make the legs of the spider. Glue on the wiggle eyes. The spooky spider is ready to scare!

If you want to suspend the spider insert a clear plastic string( available in beading section in any craft store) using a needle from bottom of the spider. This way you can make a couple of spiders and use them as window decoration during Halloween.

Wednesday, September 23, 2009

Paper Quilling : Butterfly and flowers

I have always wanted to try paper quilling and this is my first attempt at it. Paper quilling, also called paper filigree is the art of rolling paper strips and pinching/bending them at different places to create various shapes and use them to build patterns.

There are tools available for quilling but you can try the basic art without them too. I did not have the tools and wanted to try it before buying tools.

I used the following supplies to make the quilled butterfly :

1. Paper Strips of different colors ( I cut them myself using paper cutter, you can buy pre-cut quilling strips available in craft stores
2. Bamboo skewer to roll the paper strips
3. Glue

I cut thin paper strips and rolled them using the bamboo skewer.Once you roll the strip , take it off the skewer and leave it to open on its own.
The basic shapes that I have used are tear drop ( by pinching the rolled paper at one end) and petal (by pinching the rolled paper at both ends simultaneously). You can refer this link for other basic shapes used in quilling. Finally, I glued these shaped paper rolls together to create the butterfly.

By the time I had finished the butterfly I knew I will be doing paper quilling more often. So I got the quilling tool from the craft store. I also discovered my paper strips were little wider than the quilling strips available in market. As I got the tool I decided to add flowers to the project. The flower that I have added is called double fringed flower.

Instructions to make the double fringed flower:

Take a 4.5 cm by 10 cm paper strip. Fold it in the center length wise. Cut the strip at approx. 45 degrees along the folded edge as shown. To get uniform width at bottom I held a quilling trip at the open end while cutting the fringes.
Using the quilling tool roll a quilling strip of different color.Glue the other end to the fringed paper strip and roll the strip along. In the end glue the fringed paper strip. Your flower is ready. It definitely made it easy to roll the strip using the tool but you can try it out without one too.

I used shadow boxes to frame this quilled butterfly and flower project as you need some gap between the glass and back of the frame. I loved making this project and you will definitely see more of these paper quilling projects here in future. I hope you get inspired to try this beautiful art too. Happy quilling :).

Monday, September 21, 2009

Paper Quilled Jewellery Box / Keepsake Box


This craft project is a paper mache box (cardboard box) decorated with paper quilling. It can be used as a jewelery box, a keepsake box or a gift box.

Following are the supplies you need :

1. Paper mache box ( available in any craft store)
2. Paper quilling tool
3. Quilling Strips
4. Glue and Scissors
5. Acrylic paint

Paint the paper mache box inside out with the color you wish to use. I used a metallic bronze for mine. Let the paint dry completely before starting to decorate the box. You can sketch the pattern you want to make first before starting quilling. I made mine on the fly as it was not too complicated.

The shapes I used for my pattern are basic coil (center of the flower), tear drop (flower petals), petal (leaves) and S scroll (used on the outside edge).

To get the S scroll roll the quilling strip halfway in one direction. Then roll the strip from the other end in opposite direction. My previous posts on quilling have details on how to get various quilling shapes.

Here is another box I decorated using quilling. I used pearl white acrylic paint for this one. As the paper mache box is brown in color , if you are using a light color, make sure you apply multiple coats of paint.


I am planning to gift the first one to one of my girlfriends tomorrow. Hopefully she would like it :).

Friday, September 18, 2009

Happy Navratri : Paper Quilled Durga Ma

Today, September 19th is the first day of nine day long Navratri festival.The festival celebrates the victory of good over evil and is celebrated all over India in different forms. I have had the opportunity to experience most of them ranging from Dushehra celebrations in North, Garba in West, Durga Puja in East and Golu in South. I have always been in awe of the elaborate puja pandals ( halls) for Durga Puja and this creation of mine is inspired by the gorgeous idols of Durga ma in these pandals. Following are the supplies I used : - Paper quilling strips - Slotted tool for paper quilling ( bamboo skewer works too) - Glue and Scissors - Card Stock - Shadow box for framing It took me a while to figure out how to make this project. First I sketched outline of the face on the paper I was going to use as the base. For the outline of the face and eyes I used single quilling strip. You have to be very careful while applying glue. Apply it using a needle or thin brush for neatness. Always use a glue that dries clear. For the eyeballs and the jewelery I used the basic coil shape of different sizes. For her hair I have used the petal shape and for her tilak the teardrop shape. For more details on how to get different quilling shapes refer my earlier post on paper quilling. I finished the project by framing it in a shadow box with a black background. I loved making this project. It brought back all the fond memories of festivities back in India. Happy Navratri to all of you! Enjoy the festivities.

If you make something inspired by our work please give credit. We do not give permission to copy our designs for profit. Be original and take pride in your work!

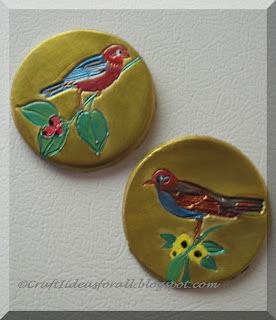
Refrigerator Magnet : Clay craft for kids


I like to collect refrigerator magnets from various places I visit and got inspired to make one myself.Kids love to play with clay and this is an easy and fun craft idea using clay. Attaching a magnetic backing makes it easy to display their craft work.

I used the following supplies :
- Air dry clay ( you can use any clay..i prefer air dry as you need not bake it)
- Acrylic roller pin to roll the clay ( Any thick marker will work too)
- Rubber stamp for the design
- Acrylic paint
- Magnetic sheet with adhesive back
- Wax paper or parchment paper


Make a clay ball of approx 2-3 inches diameter. Put it on wax paper and roll it into a sheet 1/4 inch ( approx) thick. Gently press the rubber stamp on the clay sheet. Do not press the stamp too hard as clay is very soft.Lift the stamp gently.

You can make the magnet in any shape you want. I used a glass tumbler to get the circular shape. Cookie cutters can also be used to get the shape you wish to make. Infact if you have cookie cutters in shape of animals you don't have to use rubber stamp either. Just cutout the animal shape using the cookie cutter and let kids have fun painting their favorite animal. Here is a pic with all the steps. Click on the image for larger size.


Let the clay dry for 24 hrs. Paint the design with your choice of colors and let it dry. You can use any water based paint. Cut out the magnetic sheet in the shape of your magnet.Remove the adhesive backing and attach the clay piece. The magnet is ready to be displayed.

If you are not able to get a magnetic sheet , you can also punch a hole in the clay piece ( before it dries) and attach a ribbon through it. That way it can be used as an ornament for Christmas tree or hung on a wall. Happy crafting :)!

Thursday, September 17, 2009

Clay Peonies : A beautiful flower arrangement

Making flowers has always been my passion. This is the arrangement which I created recently to gift my dear hubby on his birthday. I have been making them with paper all along but this is my first serious attempt to make them in clay.


These are the materials I used to make the Peonies.
- Air dry clay(I have used Delight brand)
- Green Acrylic Paint, Wires 18#, Fall color Bush. Styrofoam
- Flower pot
- Glue and Scissors. 
All these are easily available at local craft stores and also online. Click on the material and it will take you to the resource.
Delight air dry clay comes in white color.To make Peonies I have used the clay as is. Make 5 circular balls around half inch diameter, roll them between your palms to make a tear drop. Now keeping the pointed end down using your thumb flatten each to make a petal like shape.
Using your thumb and finger make frills by pinching the petals on the outer edge. Arrange the petals in such a way that they overlap. Now make 10 circular balls about 1 inch diameter and make 10 petals in the same way. Arrange them again overlapping each other. The peony is ready. Make 3 such peonies.

Let them dry for 24 hours and then insert a wire with glue at the tip to make the stem. Make the light green fillers by adding a drop of green acrylic paint in the clay and make 1/4 inch tear drop balls. Bind with the floral tape to finish it.
Insert the Styrofoam in the pot and arrange the peonies and the fall bush.The flower arrangement is ready!

Here is the top view of the arrangement.My hubby loved his special gift   and I got compliments from my friends at the party too.

Saturday, September 12, 2009

Flower Bouquet : Paper Quilling

I just started paper quilling and am loving it. I made this as a gift for one of my old friends. Hopefully she will like it.

Following are the supplies I used :
1. Quilling strips
2. Colored paper ( yellow and orange)
3. Quilling tool ( bamboo skewer will work too)
4. Glue
5. Card stock
6. Shadow box

Instead of using the double fringed flowers I used in my previous post I used simple fringed flowers. For the basket I cut strips from brown card stock and weaved the strips. You can use any thick paper or quilling strips. I did not have them in brown color.

To make the fringed flower, cut thin strips of paper. Roll a quilling strip using the quilling tool. Glue one end of the fringed paper strip to the quilling strip.

Once you have rolled the fringed strip, glue the end and remove the flower from the quilling tool. Use you fingers to spread the petals out and your flower is ready! Refer the image above for more details.

For leaves I used the basic petal shape. Refer my previous post for different quilling shapes.

To finish the project ,I framed the arrangement in a shadow box. Am visiting her tonight and hoping she will like it :). Do leave your comments whether you liked it or not!

Thursday, September 3, 2009

Origami Penguin Pair


Making this pair of Origami is a good way for beginners in Origami to get started. It is a great craft for kids. To get started you need Origami paper preferably. If you do not have Origami paper and want to get started right away then you can use any kind of glossy magazine paper.  To make this pair you need square papers of size 6" for Mama Penguin and 4" for Baby Penguin. Follow the steps as in the second picture. Make sure you crease the folds gently but firmly. For Baby penguin however an additional step is required where you make an extra fold outwards such that the fold is along the line joining the hands and the tail.

It depicts that the baby penguin is sitting. To make a larger group of Penguins you can make one with 7" square to make Papa Penguin and make more Baby Penguins from smaller square papers. Have fun. Origami Paper for beginners is easily available from Amazon.com. Refer my article Origami Crane for more resources.

Wednesday, September 2, 2009

Craft with pencil shavings

What do you do with your pencil shavings? Throw them away? Here is a great idea to use them to make beautiful craft.

I love to use different materials to add texture to my craft pieces. For this one I used pencil shavings. Its really inexpensive and easy to do. Kids can have fun and easily make this craft project with little help from parents.


Supplies you will need :
- Pencil shavings
- Card stock or any thick paper
- Glue
- Paint and paint brush
- wiggle eyes ( optional )

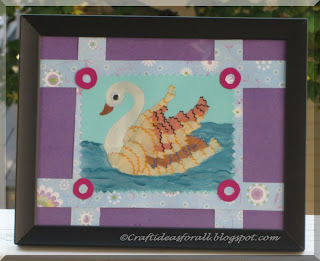
I chose to make a swan as pencil shavings look really nice as feathers of swan. You can use any pattern that appeals you. Fish scales using pencil shavings will look very pretty too.

Trace the pattern on the card. Start sticking the pencil shavings overlapping the previous one to get a nice pattern. I started from the far end ( right end of the design. It helps to hide the side of pencil shavings with no border giving your project a neater look.


Finally ,I finished the swan by painting the neck and beak and adding the wiggly eye. You could simply paint the eye too.I used some scrap-booking paper strips as borders and used a black frame to complete the project. Have fun making yours!

Tuesday, September 1, 2009

Counted Cross Stitch : Fall colors

I have used cross stitch before to create smaller craft projects like this one. This is the first time I undertook a bigger pattern. I got the kit by Dimensions Designs from Michaels art and craft store. I loved the fall colors on the pattern and decided to give it a try. Cross stitching definitely is a rewarding experience as the end product is really beautiful. But I would also mention that it needs a lot of patience. So if you are trying for the first time I would suggest starting with a smaller pattern.

There are stamped patterns where the pattern is stamped on the fabric and then the counted cross stitch ones where you have the pattern on the graph and you count the squares and stitch on the fabric based on the pattern.

There are many patterns available online for free. I prefer the kit for larger projects because it makes it easy to get all the supplies especially the different colored threads( also called floss) for the pattern.

You need following supplies :
1. Needle
2. Threads based on your pattern
3. Aida cloth
4. Embroidery hoop ( the kit I bought did not have one)
5. The pattern you want to make
6. Color key for the pattern (comes with the kit)

The kits generally come with instructions on how to do the basic stitches used in the pattern like cross stitch, half stitch, back stitch etc and the instructions are fairly easy to follow. For some detailed instructions you can refer this tutorial. I would specially suggest to look at how to start and end threads. Also start stitching from the center of the fabric to position the pattern correctly on the fabric.

Here is a picture of my work in progress.It took me a lot of time to complete this pattern but I am really proud of myself that I finished the project :). The final design is 14 inches by 11 inches. You can get it framed by a professional but I find it very expensive.

I framed it myself in a 16 by 20 frame matted for 11 by 14 design. I ironed the fabric after I was finished stitching and used masking tape to affix the fabric to the cardboard in the frame. You can refer this link for more detailed instructions on framing your cross stitch project.

I am sure I will continue using cross stitch for my projects as its so easy to do but probably more for smaller projects. Its definitely worth trying at least once.