Tuesday, November 17, 2009

Celebrate Thanksgiving with Turkey Craft


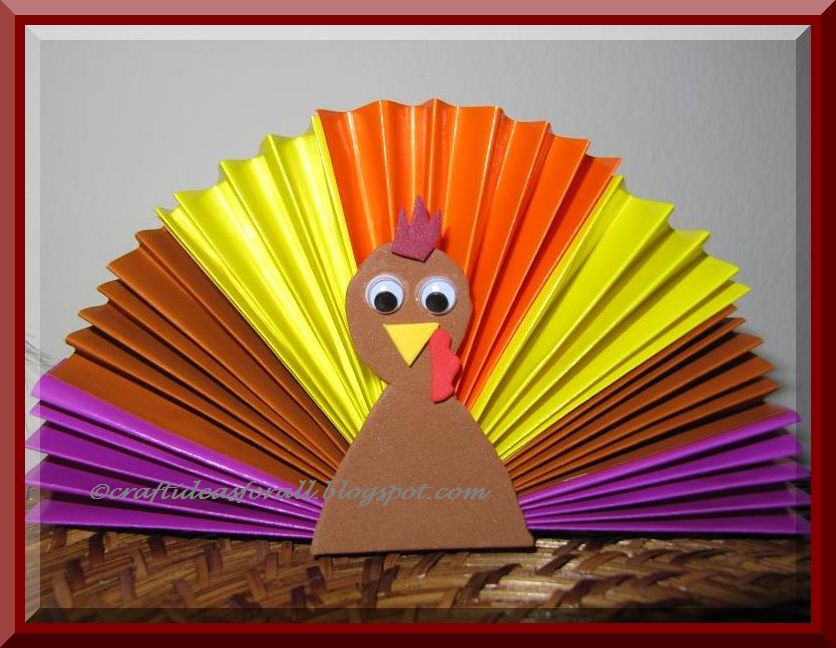
Here is a quick and interesting Turkey craft I created using mixed media. I used Origami paper and foam sheets of various colors. It can be used as simple decoration, a centerpiece on Thanksgiving dinner table or as a place card too. All you have to do is to make more of them and add the name tags to it.

Supplies required:
- Origami Sheets 7" square- Orange, Yellow, Brown and Dark Pink
- Self sticking foam sheet- Brown, Red, Yellow and Maroon
- Glue
- Scissors
- Craft knife
- Scotch tape
- Wiggle eyes

To make the Turkey craft the first step is to make accordion folds of all the Origami sheets. Fold them in half as seen in the pictures. Now cut the orange sheet from the center. For this Turkey craft we need just one part of the cut orange sheet accordion.


Arrange the sheets as shown in the picture and stick it with glue or scotch tape. Feathers for the Turkey craft are ready.

Now take the brown foam sheet and measure it so that it reaches two thirds of the height of the turkey feathers. Refer the step by step instructions and cut out the body of the Turkey. Also, cut out the other parts using different colors of foam sheets.

Assemble the foam cutouts to make turkey's body. Once done, glue the wiggle eyes.

Now glue the foam sheet body at the center of the feathers. The easy Turkey craft is ready to be used as a piece of wall art, centerpiece on the Thanksgiving table or a place card. Happy Thanksgiving!

P.S. : Yay! This is our 50th post already :). Hope you all are enjoying them as much as we are !

Monday, November 16, 2009

Framed Fall Leaves Craft for toddlers

Now, when Fall season is at its peak, it is the best opportunity to take some time and help your toddler create a fall craft which he or she will cherish for many years to come. Kids get excited by collecting these lovely fall leaves during this season. Many of you might be preserving them and some of you might be throwing them after your toddler has played enough. You might think they are too small to create a fall craft but believe me they have much more potential than you think. Help them explore by creating this fall craft for toddlers. The skill level required for this is perfectly suitable for a toddler. I tried making this with my 21 month old baby girl. She got so excited by collecting the leaves and when we started making the craft I could sense the feeling of achievement and satisfaction at the same time.
Doing something independently is so fulfilling for them and their expression priceless for us. Highly recommended to try with your toddler.
Here's how you go about creating it.

Supplies needed
- Fall leaves -Your choice of bright color medium size or rather your toddler's choice
- A thick book-To flatten and dry the Fall leaves.
- Glue stick
- Card stock- Any contrasting color with size that will fit in the leaves and leave some space at border.

Yes, this is pretty much all that you need.
Try to show your toddler how it will look once he or she has glued it on the paper.
You might let them decide the pattern if they show interest.
Once decided take the leaf and apply glue on the back side. Stick it on the card stock at the place you decided. Tell them to press it firmly. It is possible that your toddler changes his mind and sticks it somewhere else. This is absolutely fine.
Refer the picture.

Allow some possibilities of imperfection or leaves getting broken or change of design. The whole idea of this craft is to make your toddlers happy and help them learn some things in the process.

Tips: If the leaves are really fragile then it is a good idea to have the glue applied on the card stock directly and then press the Fall leaves over it. Bright red and yellow leaves turn out to be really nice.

Frame the art to make it look more professional and last long too.
Have fun.

Tuesday, November 10, 2009

Fall Leaves Spray Painting Wall Art

It is almost the end of Fall here in US. Couple of days back when I was taking a walk with my little daughter she picked up some fall leaves. She kept playing with it and was so excited. It was the first time she did it on her own. This is what gave me inspiration for this craft. Spray painting is one of the easiest and interesting craft for kids. For the basic technique you can refer our older posts.

Fall leaves have vibrant colors and are very beautiful. They are perfect for using as a stencil for spray painting. It is a good way to add color to your walls even after fall.

Supplies required for the project

- Fall leaf of your choice
(A single medium size is what I picked)
- Card Stock-2
- Old toothbrush
- Acrylic Paint (Any water based color will do)
- Craft knife
- Pencil
- Color Markers

Keep the leaf on the card stock. Draw the outline. Using craft knife cut out the leaf. This will be your stencil. Refer the picture. Now dip the toothbrush in the color you want to paint your leaf. Put the stencil on the second card stock. Spray paint with the toothbrush. Once done draw the outline using a marker. Frame the art if you feel like. Parents should assist kids while handling the craft knife.

Tip : For younger kids if you want to avoid cutting out the stencil, use the leaf as a stencil and spray paint the rest of paper you will still have a beautiful painting.

Also, if the the leaf you selected is not perfectly flat, keep it inside a thick book for one day and you will have a perfect leaf to make the craft.

Tuesday, November 3, 2009

Handmade Clay Roses and Cherry Blossoms

I have made clay flowers and gifted them to many of my friends but somehow never made one for my parents. They are visiting soon and I thought to make a flower arrangement for them. This flower arrangement has roses and cherry blossoms. Following are the supplies required for this project :

- Air dry clay
- Floral Wire and Wire cutter
- Pollens
- Floral tape
- Pointed clay tool or a bamboo skewer or a toothpick (for cherry blossom)
- Acrylic or any water based paint (to color the clay)
- Scissors
- Flower vase
- Ribbons ( I used them to decorate my vase)

You can refer to my previous post on clay roses to get the details on how to make roses. Here are the step by step instructions to make cherry blossoms. The supplies needed for cherry blossoms are shown in the picture.


Take a ball of clay and add a tiny drop of pink color in the ball. Mix it thoroughly till the entire ball gets a uniform color. Now make a small ball of 3/4th inch in diameter and taper it at one end to get a tear drop shape. Using pointed scissors make a cut slightly away from the enter of the tear drop. Now slit the smaller section into two and the bigger one into three.


Now using the pointed clay tool / bamboo skewer spread out each petal as shown in the picture. Support the petal with your finger while spreading it out. It may take you multiple tries to get a neat petal but once you get the knack of it you will be surprised how easy it is.

Take a bunch of pollens and twist wire around them as shown is the picture. You may prepare multiple sets of pollens before hand so that when you are making flowers you save time and hence prevent clay from drying. If the clay still gets dry, you can add a drop of water it to prevent cracks.

Insert the wire with pollens at the center of the flower and pull it down. Make tiny notches at the tip of the petals ( you may skip this step) to finish of the flower.
Leave it to dry. Before adding them to the flower arrangement wrap floral tape around the flower stem. These flowers look very pretty and can be used standalone or in an arrangement with other flowers.


For the vase I used a small wicker basket and decorated with ribbon and pearl. I preferred the wicker basket as it would not break during travel when my parents take it back to India.I loved the final flower arrangement especially the cool spring like colors.

Hopefully you enjoyed this tutorial and will get inspired to make these flowers. Here is another picture of the finished arrangement.