Monday, April 19, 2010

Kusudama Flowers in a Vase


Origami Kusudama Flowers are one of the cutest origami creations. It is easy enough for kids to make with little adult supervision. These make a perfect gift for their Mom this mother's day. What can be more simple, easy and beautiful?
Follow the instructions and pictures to make one of these for your mom this Mother's Day.

Supplies you will need:

- Origami paper 3 inch squares : 5 for each flower
- Green Chenile stems - 1 for each flower
- Glue
- Vase (if you want to keep in vase)
- Scissors (optional, if you want to cut squares from bigger size paper)

Origami Paper is easily available from various online resources like Amazon.com
We have used Melissa Doug Origami Paper 6" squares They are great for beginners. We cut them into 3 " squares.

Follow the steps shown in the set of pictures to create your first flower.


1. Collect the supplies.
2. Cut into 3 inch squares.You need 5 such squares for one flower.
3. Take one square.
4. Flip it so that the white side is on top and fold bottom corner to top.
5. You get a triangle, now hold the right corner and bring it to the top point.
6. Now bring the left corner to the top. You will get a square.
7. Fold the right flap down so that it matches the edge of square.Press firmly.
8. Fold down the left flap so that it matches the left edge of the square.
9. Open the right side flap as shown to flatten them.


10. Open the left side flap in the same way.
11. Fold the top triangle on the right side towards you. Crease gently.
12. Fold similarly on the left side.
13. Fold the triangles back.
14. Put little glue on the edges as shown.
15. Glue the outside triangles and hold it till it sticks.
16. One of the five petals is ready.
17. Make five such petals.
18. Glue the five petals together to make a flower.


19. Make one more such flower in any other clor of your choice.
20. Take two chenile stems. Keep the length about 1 inch more than height of vase.
21. Simply push the stem from the center hole of the flower.

Your flowers are ready.


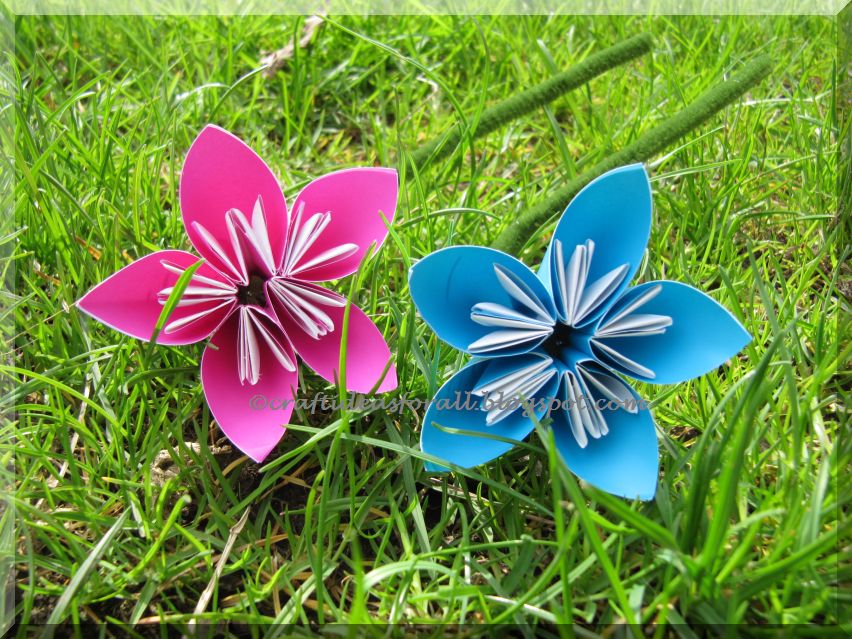
Give them as is or put them in vase. Gift this lovely Kusuduma Flowers in a Vase to your mother on mother's day.


Tips:
-Make 5 of these flowers and tie them with ribbon to gift as a bouqet.

-Make 12 of such flowers and glue them together to make the famous Kusudama Ball.

-Kids can gift it to their friends or decorate their table too.

Monday, April 12, 2010

Keepsake foam box with foam stickers


Decorating Foam boxes with stickers is fun for kids. Even toddlers can do these simple projects.
Recently I found a foam box which can be used as a keepsake box, a bangle box , color box or simply a pencil case. This was merely $1 at Joann. You can find it or something similar to this in any craft store.
The stickers I used are Creative Hands Daisy sparkle 3D stickers. This is also available in various varieties in craft stores or online Amazon.com

Supplies needed

- Foam box (as shown in the picture above)
- Daisy Stickers contrasting color (Creative hands Daisy sparkle 3d)

For this project first decorate the top lid of the box. Give your child the stickers they want on their keepsake box. Involving the child will make this extra special.
To make the one shown in the picture above, follow the step-wise instructions as marked.
This might require a little guidance for the toddler. Help your toddler to first peel off the biggest size daisy that will fit the top of the box and then hand over the ones little smaller in size.
To complete the project follow the set of pictures below.


This is what I created with my toddler. You can see her peeling off stickers on her own and sticking them. I was telling her to pick the big one first and so on. She is so happy that she completed this whole project herself.
I was surprised to see that toddlers are smart enough to do this. Moreover, she keeps showing this to all her friends that she made this herself. Making crafts is a great way to help kids feel a sense of satisfaction and achievement.

Tips: It is a good idea to buy stickers in different varieties especially when they are in sale.

Let your child create on his own if he wishes to. However, if you help your child understand what you want him to do by showing him how to create one, it develops the much needed skill of following instructions. Either way it helps the child learn something and have satisfaction of creating something on his own.
This is a great idea for activities at a birthday party or play date.

Friday, April 2, 2010

Easter Basket


We wish all our readers a very Happy Easter!!
Thanks to all for your participation and encouragement while we were experimenting and creating Easter eggs. Decorating Easter Eggs is so interesting. I felt like creating more and more Easter Eggs with new techniques.

We have kept all our decorated eggs in the Easter Basket. Washi eggs and Paper quilled eggs are the ones we created earlier. New additions are eggs decorated with permanent marker and crayons. A pair of cute chicks made this Easter basket complete.

The Easter Basket is great as a center piece or as a corner piece on a end table. Easter baskets make great gifts too.
Have fun and enjoy Easter.
Happy crafting and egg hunting.

Tips:
- Use lovely ribbons in spring colors like light blue, yellow, orange, green to make your white basket more colorful.

-Easter grass is great for creating the base. This is easily available in craft stores.

- Click here for Washi Eggs tutorial and here for Paper quilled Eggs tutorial.