Sunday, October 31, 2010

Personalised Greeting Card


Happy Halloween and Happy Birthday

One of my dearest friends birthday falls on Oct 31st. This is to wish her a very very Happy Birthday. We wish her all the very best in this lovely new year in life. Enjoy the life to the fullest. Hope all your dreams come true and that too very soon.
Wishing health and happiness...

This personalised greeting card was created with lot of thought. I wanted to gift her something unique, something she might be able to frame if she choose to. After a lot of thought I decided to make this card a personalised one. So instead of cake or something related to birthday I quilled her nick name and made a card. Her face lits up with amazing joy whenever she hears her nick name esp this one "LITTLE". That's the reason I chose this one.(Yes, she has more than one nick name).


I used basic quilling shapes as you would have known by now from our previous posts.
Also used basic husking technique for the base of alphabet.

The red lace was punched out using one of Martha Stewart's punches. They are amazing. You have to try them out to really appreciate them. Punches from other brands can also be used. They are little cheaper than Martha's tools.Craft punches are easily available in stores like Michaels and Hobby Lobby.
I have used pvc glue for sticking quilling pieces and double sided tape for the lace.
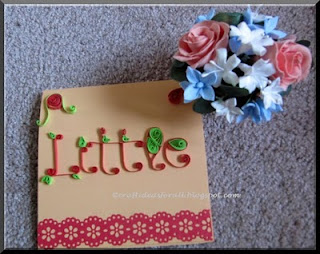


Happy Birthday Little !!
This one is especially for you. So happy to be your friend. Have fun.

Tuesday, October 26, 2010

Fall Leaves Wall Art


Nature offers many avenues of craft. One of the best times of the year for nature craft is the Fall season. The wonderful colors of fall leaves inspire many of us in different ways. Some love to take pictures, some make beautiful painting. Yes, you guessed right. One of our favorites is making fall leaves crafts.

This simple yet elegant piece of wall art was made using fall leaves. With a little care you can also make this beautiful Fall Wall leaves Art.

The technique used here is easy. It is called Botanical Pressing. In simple terms it is collecting the samples and pressing them. The more organized collection of plant specimens are called Herbariums and they can last hundreds of years. Scientists have been using this technique since the Victorian era for botanical studies.

Well, you need not be scientist to create this Fall leaves craft. Kids love this craft. A little supervision can help them make it perfect and long lasting.

Supplies you will need:

-Fall leaves of your choice
-Plant or flower press (optional)
-Old Newsprint or blotting paper or paper towels
-Phone Books or any other heavy books - 3
-White craft glue or spray adhesive for delicate leaves.
-Canvas (preferably stretched on wood) or any base to stick leaves on.

Instructions

1. Collect bright colored leaves.
2. Wipe off the dirt if any using moist kitchen paper towel.
3. Keep the leaf carefully in old newsprint or blotting paper. Prepare other
leaves similarly.
4. Put them in layers and press in plant press or flower press. Tight with
Velcro straps. If your press does not have Velcro straps then put heavy
books over it.
5. If you do not have plant press then you can keep the leaf in blotting paper
or paper towel, place in between pages of a big size book like a phone book.
Put more heavy books over it.
6. Keep these untouched for a week or two depending on how wet the leaves are.
7. If you are using telephone book change the paper towels every few weeks.
8. Do not disturb the assembly as when the leaves are dry they tend to brake.
9. Once dry, glue the leaves on the canvas or any base you chose. For more
delicate leaves use spray adhesive and forceps.
10. Once they are dry, frame them and hang on the wall. Your beautiful fall
leaves wall craft is ready.


Above is the picture of the completed Fall leaf wall art in my house.

Tips
-The basic technique of botanical pressing is to collect samples when they are not dry. They work best when they are moist. It prevents cracking and breaking when pressed.

-Samples should not be wet with rain or dew. Fall leaves that just dropped work fine as they are not dry yet.

Wednesday, October 20, 2010

Pumpkin bat craft


The cutest PURPLE PUMPKIN BAT CRAFT ever....

This sparkly purple bat is the cutest Pumpkin craft this Halloween season. Finally a Halloween Craft which kids adore.
My 32 month old daughter made it recently at one of the craft workshops at Michaels.
While I was shopping for some clothes for my recent invitation to Oprah show taping, my daughter was busy crafting this lovely and adorable PURPLE PUMPKIN BAT.
By the time I decided what to wear for Oprah show, her craft was ready.I had no clue what they were doing all this time. Thanks to her dad. Both Father and daughter were ecstatic and so proud of this creation.

Recently,my daughter's favorite color has become Purple next to Pink.She was delighted to see the color choice as Purple.

I just wanted to share the picture of this Purple Pumpkin Bat Craft as this is my daughter's first Pumpkin Creation and really this is the cutest thing I have seen this Halloween. My daughter who didn't like the spooky spiders on the Pumpkin that I made this season (she is really scared of them) has fallen in love with her own Pumpkin creation.
I cannot forget the sparkle in her eyes when she told me "Mommy I made it myself". Don't touch it. Let it dry, and so on. She was non-stop explaining all the steps of creating it. After the entire story she said I made it for "ATTA" - for her birthday gift.She is her best friend, I must say. We were about to go to one of our family friend's birthday party the very same evening.

It is a different thing that she wanted her Purple Pumpkin back after two days. So the Pumkin is back with her. A return gift from her favourite ATTA.

The only thing that bothered her most was "The Pumpkin has only two teeth". "But I wanted to make more". One of these days I am going to let her as many teeth as she wants for the PURPLE PUMPKIN. She wants to make as many teeth as she has for the Purple Pumpkin Bat she has made.

The shining (read Glitter) they let her put on the Pumpkin was a big hit. Also, the feathers.
I must say this is a perfect craft for a toddler who loves to craft.
She also told me that Boys were making Pumpkin Spider which was black. But, she made Pumpkin Bat as it is beautiful and it is PURPLE.
Though I have not seen how they created it. I think this is a very interesting and easy craft which a child can make with little help and supervision of an Adult.
I guess this is how you can make it too.

Supplies you will need:
-Craft pumpkin
-Foam Brush
-Purple water based color
-Glue based Glitter Pen -Purple
-Feathers
-Foam sheet purple for ears and wings
-Scissors
-Google eyes large
-Cotton
-Paint brush
-Black water based color
-Cotton ball for nose

Color the Pumpkin. Simply use glue gun to fix the feather, foam sheet ears and wings,google eyes,nose. Kids take help of parents or some Adult while using glue gun. Decorate with glitter and paint the teeth.
It makes great decoration for Halloween. Ours is sitting in the Yard till it does not rain.


Tips: After painiting it in the color of your choice let the Pumpkin Dry.
To make it more exciting use Glow in the Dark Glitter. It is available at Michaels.

Thursday, October 7, 2010

Spooky Spiders on Pumpkin


Aren't these spiders SPOOKY !! These crawling spooky spiders on the pumpkin make a perfect centerpiece for Halloween. A great Halloween craft that kids can make.
My daughter thinks they are real Spiders. She says mommy they are so Scary. Well, this is what we want on Halloween. So really happy how this turned out.
Let us all make it this Halloween.


Supplies needed -

For one spider

-Craft Pom poms balls black 2 no.s
-Chenille stems black standard lengths 2 no.s
-Chenille stems black 2 inch piece
-Craft Glue
-Scissors
-Google eyes (optional)

For Pumpkin arrangement

-Craft Pumpkin also called carvable pumpkin

-Spiders 3 no.s


Step by Step Instructions -

1. Refer the pictures to make the spider. Take two pom poms and glue them together.
2. Cut the chenille stems such that you have four equal lengths.
3. Hold these together and using the 2 inch piece of chenille stem tie them together
as shown in the picture above.
4. Now using glue stick the pom poms you prepared in step 1. Let it dry.
5. Make two more spiders following the steps 1 to 4.


Now take the craft pumpkin and decide where you want to place the spiders. Hold one spider in your hand and carefully insert the spider legs in the pumpkin. Since chenille stems have wire inside they are so easy to insert in the craft pumpkin which is usually made of styrofoam or similar kind of material.

Similarly decorate your pumpkin with more spiders. Your spooky spider pumpkin arrangement is ready. You can use it as a centerpiece or as part of a big collection of pumpkins and other halloween crafts.

Happy Halloween !! Happy crafting.


Tips

-Parents supervise younger kids while using scissors.

-If you think your child will pull the pom poms you can secure it better by sewing instead of using glue. They are more sturdy this way.

- Use different colors of chenille stems to make spiders more attractive. Let your child use his imagination.

-If your child loves google eyes on every craft he makes, you can use them on spider as well.