Tuesday, April 16, 2013

Curvy and Cutie Paper Caterpillar Craft


I think the first big word that my daughter learnt when she was 3 year old was CATERPILLAR. Thanks to the story book "The very hungry Caterpillar" by Eric Carle. There was something about this book that she was always so fascinated by Caterpillar and the fact that it becomes Butterfly.

 For a while she thought any big word can only be caterpillar. Spring is finally here and she has been learning about the life cycle of a Butterfly in her 4 yr preschool. I felt it was the perfect time to finally post those pictures I have planned to post from long.


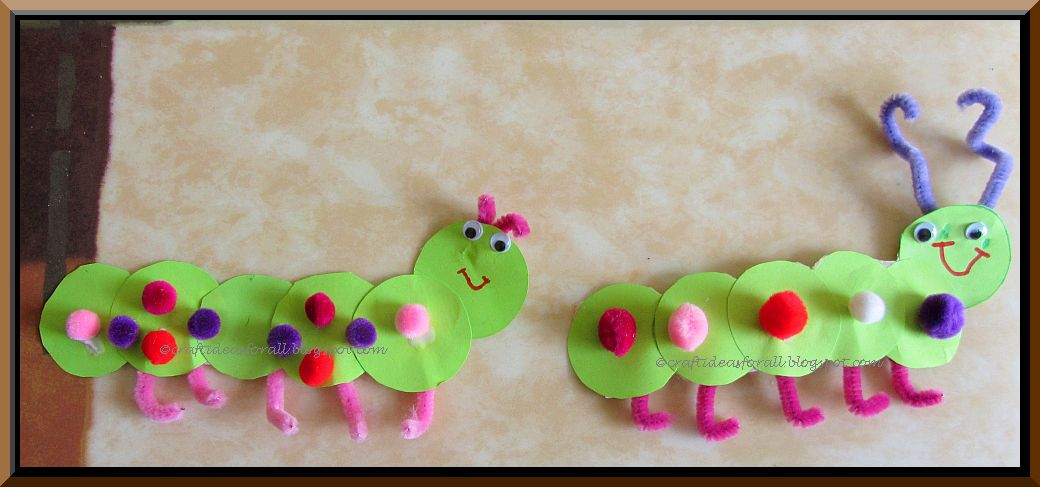
 I am sharing the caterpillar craft she did when her cousin came to visit us.They ended up naming the caterpillar. I guess it was Curvy and Cutie. Here is how you can make your own Curvy and Cutie Caterpillar.  

Supplies:
-Green print paper or construction paper
-Google Eyes
-Chennile stems
-Pom poms
-Glue
-Masking tape
-Bangle or similar material to make circle. You can use circle punch also.
-Safety Scissors

 Instructions: Follow the pictures. 


 Notes:
 -  While making this caterpillar kids learn making circle using another material. This is an important craft skill. Kids need to practice to get better at this.
 - Cutting circles adds to the fine motor skill practice that is so vital at this tender age.
 - If you feel your child's attention span is not long you might want to cut the circle and give or do this craft in two sittings. Cut circles in one and make caterpillar in another one.
 - To make it more interesting and reinforce the story you might start by reading Eric Carle's story book. The very hungry caterpillar or click on the link and show them the video where Eric Carle is reading the story himself.
- It is a fun group craft. Kids enjoy it more when done in group.
- It is easier and quicker to fix the chenille stems or pipe cleaner legs using masking tape, however if you do not have it you can use glue. Tacky glue works best but you have to leave it for a while to dry.


 Variations: You can use different colors of circles or you can use different sizes of circles to make it more interesting.

Sunday, April 7, 2013

Handmade Birthday Cake Greeting card for 5th Birthday


Recently we celebrated my daughter's 5th Birthday. The moment this new year started she was all about reverse counting the number of days left for her birthday. I guess its like this for every 5 year old. Every time she goes for her friend's birthday party I make sure that she makes a card. She was complaining the other day that "I make card for everyone but most of my friends buy the card and send it. No one really takes the trouble to make it." She is right,except couple of her friends no one really makes it. Personally, I feel that making card for someone you care about is one of those gestures that express your sentiments at a whole different level. If you cannot make it, even then if you buy a handmade card it definitely tells that you took the time and made the effort to give a special card.

 I promised myself that this time I will make a unique card for her birthday. Just to inspire her and also for her to feel that mom cares and makes card for me too. Can you believe, I made it at the day of party as I was running out of time. With a new baby at home it is hard to find time. She was about to wake up and my husband tells me to drop everything and finish wrapping the gift and make the card. There is nothing more important than that. Trust me, I did what he said and ya, I agree, there was nothing more important than that.

So here it is, the card that I made for our daughter. Both of us (mom and dad) ended up writing inside in such a way that she could read. She is learning to read right now and getting better day by day.  

Supplies needed:
- Blank card
- Envelope
- Card stock yellow, red and polka dots
- Scissors
- Glue stick
- Colored Pens and pencils
 This is a kind of a 3D card you might say. The base is like a step cut-out and then there are individual strips with corners scored with a bone folder so that it looks 3d.

Decorate it with colored pens and pencils. Write the message and give it to your loved one. I guess the rest is self explanatory. If you have any questions about how I made it, feel free to ask. Didn't get a chance to take the picture while making it.

 PS.She loved the card and says I can't believe it mommy you made such a lovely card for me. She was happy that both of us wrote.